How To Start a Blog in 2025 (Everything You Need To Know)
Do you want to learn how to start a blog in 2024, but don’t know where to begin? I’m here to provide you with a step-by-step guide to starting your own blogging empire in 2024. Whether you want to hobby blog, blog on the side (like myself) or just garner an idea of blogging – you’ve come to the right place.
Blogging is a fantastic way to make additional income but it certainly comes with a lot of effort from the start. If you think you can get rich quickly from blogging – it’s not going to happen. However, if you’re comfortable with investing time in blogging regularly, then you’re looking at residual income (CHA-ching).
As a seasoned blogger (blogging since 2018 – no biggie) I’ve made my fair share of questionable decisions. Those questionable decisions have led me to make better choices and that is exactly why I want to help you get started with your very own self-hosted site. It can be overwhelming when you think about all that it takes to get a blog off the ground, so just take it one small step at a time and you’ll reach your blogging goals, before you know it!
So, let’s get you started and bring in that money!
DISCLOSURE: For the sake of transparency, some of the links in our content are affiliate links. This means, I get a commission if you purchase through my links, at no cost to you. Read the full disclosure here.
How To Start a Blog in 2025 for Beginners
- What exactly is a blog?
- Should you start a blog in 2025?
- Step 1: Find the right niche for your blog
- Step 2: Pick a name for your blog
- Step 3: Choose a hosting site and register the domain name
- Step 4: Sign up with wordpress.org
- Step 5: Decide on a website theme
- Step 6: Sort out your legal pages
- Step 7: Install and activate essential plugins
- Step 8: Setup your newsletter platform
- Step 9: Open a Pinterest account and start pinnning
- Setup 10: Enjoy the journey
- Frequently Asked Questions
What exactly is a blog?
A blog is what you make it, but for many (including myself) it is a website that performs like an online journal and is updated to provide readers with help or guidance. For example, my blog in particular focuses on manifestation, travel, and wellness. Therefore, I blog about topics such as, but not limited to manifesting your dreams, affirmations, travel itineraries, self-care ideas, and packing guides.
If you’re a bit confused – don’t worry, we will get to the nitty-gritty very soon. I’ll walk you through setting up your self-hosted blog, sharing your posts, and providing a general idea of how to manage your site.
Should you start a blog in 2025?
YES – absolutely – right away! There’s never a wrong time to start a blog and that’s why I’m writing this guide to help you with your very own blog business in 2024. The upfront costs to start a blog are often minimal and I’m here to assist you with exactly what you need. When it comes to blogging, I’ve spent quite a bit of money and at times on unnecessary expenses, so I want to ensure you don’t do the same thing.
In light of being transparent, I will say that if you start a blog and you want to see a return in monetary value – you need to put in work. Many people quit blogging within a year because they don’t see the money and therein lies the problem. In order to truly reap the benefits of running your own website, you need to be both consistent and content, with writing posts. Often when it comes to blogging it’s mind over matter. With the right tools and resources, you can successfully start and manage a profitable blog.
Now, let’s get down to business!
These days wherever you land in the blogging hemisphere, you’re likely to hear the word niche. I actually used to hate hearing the words “pick a niche and stick to it”. The reason we’re told to pick a niche is essentially due to the chances of profiting from one specific niche being higher than multiple niches from the get-go. I’m not saying it’s impossible to start a blog that covers numerous topics like travel, fashion, food, and overall lifestyle, but when you’re starting out it takes longer to get noticed. When you’re wearing many hats, it not only takes Google’s algorithm longer to understand what your blog is all about, but it also, makes it difficult for you to be an expert on one subject.
Step 1: Find the right niche for your blog
Once upon a time, not too long ago – I used to blog about travel, but as time passed I began to include the wellness and manifestation niche. Since I am passionate about those topics, it just made sense. I think it’s really up to you, whichever direction you choose to go, but I would recommend taking some time to brainstorm and think about what gives you that twinkle in your eyes. There isn’t one right niche that will rain money on you, so pick something that you know will be a good long-term fit.
15 Niche ideas to help you get the ball rolling…
- Travel – specific to your country of residence, bucket lists, or worldwide itineraries.
- Diversity and inclusion – discussing topics that are often overlooked and providing a platform for the injustices affecting Black, Indigenous, and People of Color.
- Food and recipes – deserts, drinks, curries, or pasta.
- Exercise – niche down even further and only blog about running or biking.
- Meal planning – healthy eating, vegan or vegetarian meals, etc.
- Parenting and baby tips – for single mothers or expecting parents.
- Fashion – from seasonal trends to vacation wear.
- Pregnancy and motherhood – tips and comfort.
- Wedding – tips on planning and execution.
- Marriage – advice, and tips for newlyweds and long-term commitments.
- Home décor – from DIY décor to interior and exterior setup.
- Beauty and skincare – the latest makeup must-haves to a healthy skincare routine.
- Mental Health – drawing from the opinions of experts and your own personal experiences.
- Blogging – teaching others to blog like a boss.
- Wellness – everything from anxiety to self-care, to taking care of your body, mind, and soul.
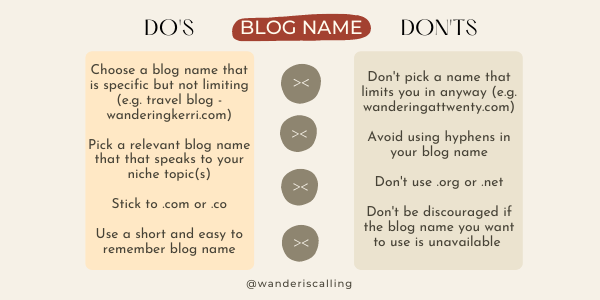
Step 2: Pick a name for your blog
Brainstorm, brainstorm, brainstorm, and don’t stress if the name you’ve settled on is taken. I had three other blog names in mind before I chose Wander is Calling. Take your time, and enjoy the process of picking a name that is easy to remember and speaks to you. When it comes to choosing a blog name, you don’t want to limit yourself – let’s say you decide to blog about food and name your blog SweetsByTia. Off the bat, I would assume your blog is about sweet treats, and should you decide to blog about other types of food – this could hinder your exposure.
Here are some good blog name examples: The Blog Abroad (Travel Blog), Making Sense of Cents (Financial focus blog), and Its All You Boo (Goals and Wellness Blog). All the previously mentioned blog names speak to their blog content.
Step 3: Choose a hosting site and register the domain name
Signing up for Bluehost only takes a few clicks!
- Head to Bluehost’s website.
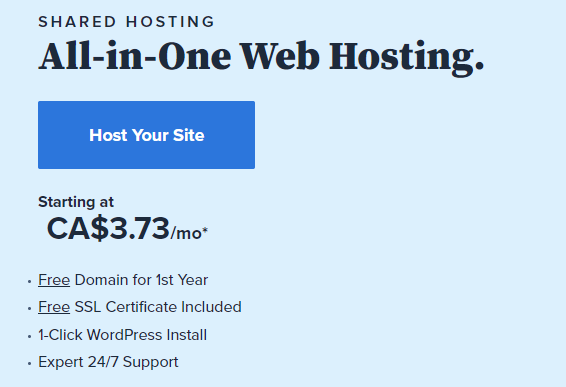
- Choose the right plan for you.
- If you’re serious about blogging, I recommend signing up for the choice plus plan. It’s always better to start somewhere in the middle and then upgrade as you grow.

- Register your domain with Bluehost or if you already have one pick the other option.
- 1-year free domain included with all hosting plans.
- Free SSL certificate (secure website encryption) included.

- Enter your billing information and pick your account plan.
- A longer-term plan works out to cheaper pricing.

- Review your information, hit pay, and viola – you’re the proud owner of your very own blog!

You won’t be able to access WordPress for the first 24/48 hours, as it takes some time to assign your domain.
Register your domain name and get hosting with Bluehost, for a FREE domain during your first year of blogging, as long as you opt for at least 12 months’ worth of web hosting.

Note: If you purchase a domain it’s important to turn on auto-renew. The last thing we want is to lose your domain in a year.
TIP: Sign up for a 36-month term and save money!
Step 4: Sign up with wordpress.org
Time and time again you will read one thing – opt for a self-hosted WordPress site. Without a self-hosted WordPress site, you are limited when it comes to plugins, theme options, and ultimately monetization. A self-hosted WordPress site is your best bet for a professional and easy-to-use, money-making blog.
Connect your hosting package from Bluehost to your WordPress blogging platform and you’re practically almost set.
There is a difference between wordpress.com and wordpress.org. You’re going to want to sign up with wordpress.org, as it provides you with the flexibility you’ll need to run your blog.

Step 5: Decide on a website theme
There are plenty of great options available on Studiopress themes. Do some research and pick something that you feel would be a good fit for your blog. When choosing a theme – think from the point of view of your audience. Will it be easy for them to maneuver your site? If the answer is yes, then you’ve found a winner! Try not to get lost in the exciting world of Studiopress designs – I know it can be tough considering they have so many options, but trust me at the end of the day – you want a clean website that is easy to navigate.
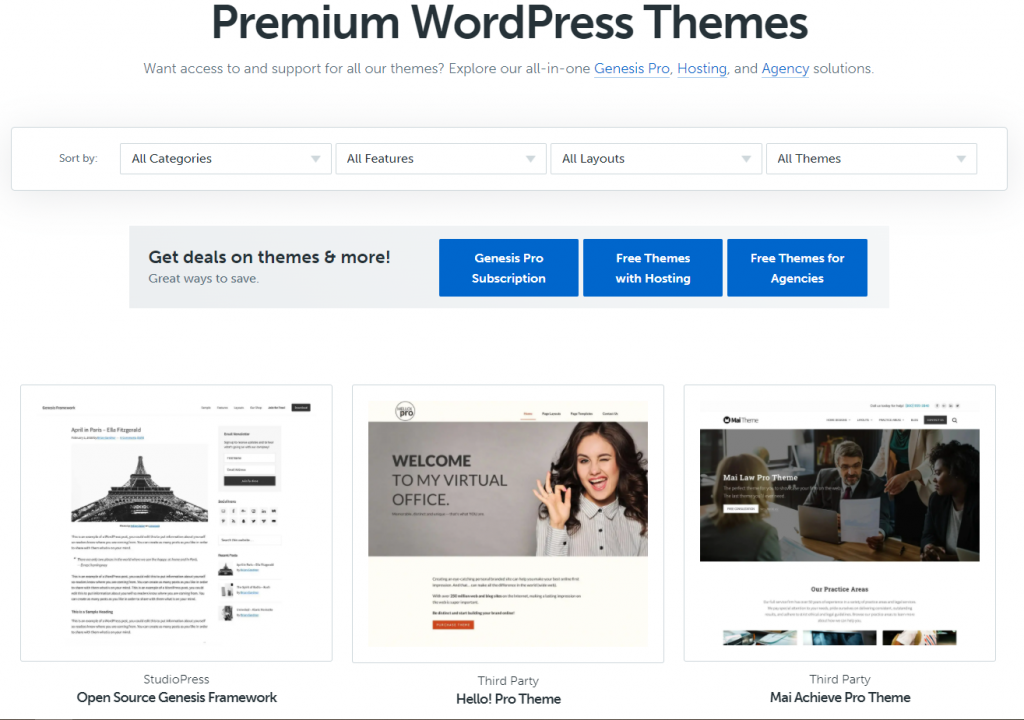
You can use a free theme to avoid the upfront cost, but remember this will be a one-time purchase and it’s a better idea to start with a paid theme from the start. I used a free theme when I began my blog and the switch to a paid theme was a pain, because I not only had to learn the ropes, I had to go into my blog posts, change my fonts, and images and rejig the pages. Needless to say, it required a lot of work, that I could have avoided had I gone with a paid theme, from the start.

Ultimately, the choice is yours, but I do recommend going with a good-paid theme, as it is a one-time purchase that will prove beneficial to you.
Step 6: Sort out your legal pages
You’re going to need two to three legal pages on your site which can easily be found by your visitors. It’s very important that you get the legalities out of the way upfront. Why? Well, you need to legally protect yourself and your blog.
The legal pages that you are required to have on your site include your privacy policy, disclaimer, terms, and conditions. Amira from A Self Guru is a blogger and lawyer that provides easily customizable legal bundles and I would recommend that you purchase a legal bundle from Amira.

Investing in Amira’s legal bundle will ultimately, help you sleep a little better at night. So, if there is one big takeaway from this post, don’t avoid paying for this investment. I know plenty of bloggers that trust and use Amira’s legal packages to protect their sites.

Step 7: Install and activate essential plugins
To install and activate a plugin follow the steps below and repeat them for each plugin, where applicable. There may be some extra steps involved for certain plugins, but the general idea of activating the plugin remains the same. The plugins below are free and essential to the functionality, as well as the safety of your website. Of course, as you continue to blog there will be changes to the plugins you use, and perhaps you might upgrade from free to paid plugins.
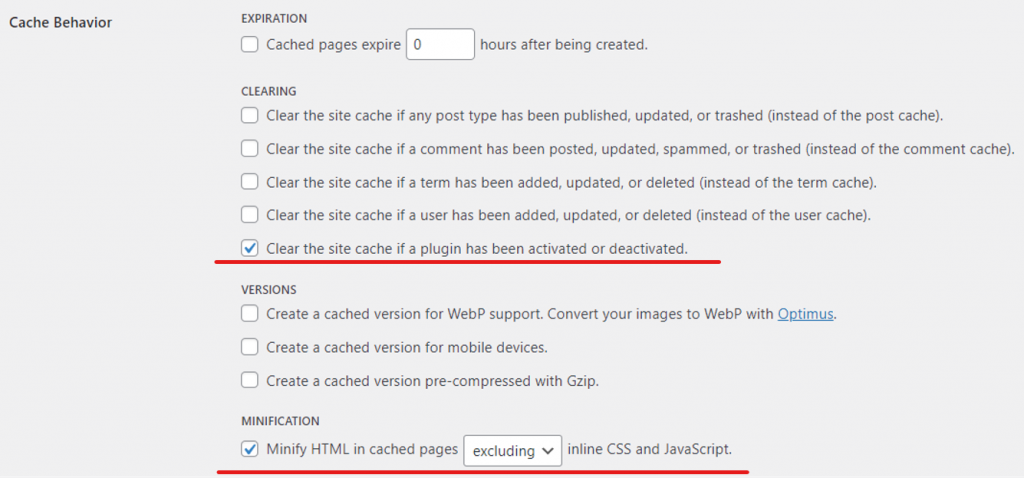
- Cache Enabler – caching tool that is easy to use, and improves site performance for a faster load time.


- Jetpack – provide WordPress security, backup, speed, and growth.
- Updraft – a great tool that automatically backups your blog to Dropbox, Google Drive, or other storage.
- Yoast – monitors search engine optimization and helps keep you on track.
- Shortpixel – image optimization plugin that compresses your images and pdf documents.
Search engine optimization (SEO) is a big deal if you want to rank high on search engines like Google. I’ve linked some valuable articles below to help you on that front. SEO can seem both daunting and overwhelming but much like blogging once you grasp a handle, you’ll be coasting through.
On that note of ranking well on Google, I use KeySearch, which is a tool to help you identify the types of keywords, search volume, and ranking of posts on search engines. Keep in mind, keywords are an essential target if you are looking to rank on the first page of search engines like Google.

KeySearch is a paid tool that I use when creating blog posts because other than Pinterest, I want to also rank well on Google. Unfortunately, I only purchased KeySearch later on in my blogging journey and sort of blindly hoped my posts would do well on search engines like Bing, Yahoo, and Google.

Tip: To get 20% off KeySearch use the discount code KSDISC.
Step 8: Setup your newsletter platform
Hooray! you’ve pretty much set up your blog…there’s just one more tiny detail – building your very own email list. Once you start blogging you’re going to want to let your visitors know that you have new and exciting posts to share and how better to do that than share them with your email list!
Email marketing is a blogging necessity. Without an email list, it would be much harder to promote your blog posts, sell products/services and garner a dedicated readership.
To get started with your newsletter platform – sign up for ConvertKit. I’ve been using ConvertKit for years and definitely believe, they are worth the investment. However, since you’re just starting out, you could signup for free and start growing your email list.
Throughout my blog, I have freebies and opt-in incentives ready to go with the help of ConvertKit. The platform is easy to use, they have great customer service, and provide different opt-in forms to meet your varying needs.

I’ve had countless sleepless nights, trying to use other email providers. Thankfully, once I switched to ConvertKit, I haven’t looked back.
Step 9: Open a Pinterest account and start pinnning
Most bloggers swear by Pinterest as their main source of blog traffic and they aren’t lying. If you want to grow your blog, apart from learning and understanding SEO – you will need to create and manage pins on Pinterest, with engaging titles.
Tip: Your Pinterest goal should be to create click-worthy pins.
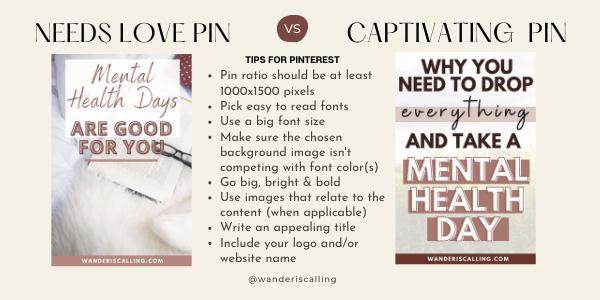
My go-to pin-creating tool is Canva. Canva is a platform that allows you to create just about anything, from Pinterest pins to journals, checklists, and flyers. If you don’t have a Canva account – sign up for Canva pro, but you’re always welcome to try out the free version before you commit. I use the pro version and it gives me so much more flexibility to not only create pins but make graphics for blog posts and emails alike.
When using images from Canva or royalty-free sites like Pixabay, Unsplash, and Pexels – just ensure you are following their legal terms. I’ve used royalty-free images in the past when I didn’t have a picture of my own, but as of late, I started to purchase photo bundles from Ivory Mix to avoid worrying about copyright.

Pinning manually to Pinterest can be exhausting, so I use a little something called Tailwind which helps you schedule and plan for months on end. Tailwind is a Pinterest scheduling unicorn tool. I’ve been using it for years, it helps me set and forget. I like to bulk create different types and styles of pins; then I schedule it to tailwind and rest.

Tailwind also has groups with other bloggers, that you can join and share pins with, who in turn can share your pins on their Pinterest profiles – for an even bigger reach. Definitely consider signing up for Tailwind to help make your blogging journey a little bit more manageable.
Setup 10: Enjoy the journey
It’s a slow journey, with dips and peaks. Embrace the dips along with your peaks. I wasn’t sure what to blog about or where to go when I first started, so I want to leave you with a few pointers to help ease you into your new venture.
- Don’t worry about the metrics all the time. If you worry about the numbers, you’re playing a losing battle. Someone once told me that blogging is a marathon, not a sprint and that is a mantra worth keeping.
- If you’re unsure of what to blog about then I’d recommend heading over to Pinterest and looking into what others in your niche are discussing. Draw on some ideas from other avenues, but don’t copy them. Rather find inspiration and use it as a brainstorming session for yourself.
- Be kind to yourself and take breaks. Don’t hole up all day working on your blog.
- One of the best ways to make money blogging is through affiliate marketing and if there’s one know-all course that will help you along the way – it’s Making Cents of Affiliate Marketing. I truly, truly wish that I had purchased this course from the get-go. The number of posts I had to go back to and apply what I learned through affiliate marketing was brutal. Course creator, Michelle Schroeder makes over $50,000 a month from affiliate income alone. If you want to get it right from the start, you have to invest in yourself – there is only so much free content available to you online.
- Don’t skimp on the upfront costs, even if it seems like a lot to start – just remember a lot of the costs are a one-time investment to help you hit the ground running. Hand on heart the expenses mentioned in this post will help you in the long run, because after all, it’s a marathon, not a sprint.
Enjoy your blogging journey and remember that it’s not just all about reaching your destination, take a moment or two to embrace the journey. Learn, reflect, rinse and repeat.
Frequently Asked Questions
Should I start a blog in 2025?
Yes, the answer is to start now. Don’t wait – don’t think about it. If it’s overwhelming with all the steps mentioned above, then do one step each day until you reach the final step. Blogging is still a profitable niche and you still have hope in 2024. Don’t let the what if’s weigh you down.
How can you make money blogging for beginners?
There are plenty of ways to make money blogging as a beginner – such as using Google AdSense, Affiliate Marketing, sponsored posts, and selling your own products/services. I would recommend that you join as many affiliate programs as possible and only promote items that you believe in or use. Affiliate income is a great way to make money, as you grow your presence.
Tip: If you want to learn more about affiliate marketing without investing in a course. Signup for Making Cents of Affiliate Marketing’s Free Ebook. Not only is the 36-page guide completely free, but it’s also a helpful tool for beginners!
How much does it cost to start a blog?
To start a blog you’re looking at some reoccurring costs like blog hosting, domain name, keyword research, and blogging tools which can run you anywhere upwards of 100 CAD. If we factor in one-time costs like purchasing a theme and legal bundle – you’re looking at over 300 CAD. Bear in mind that not all costs are reoccurring and in order to benefit from a well-managed blog, you’ll need to invest in your blog.
How to start a blog for free and make money?
I don’t think you can create a blog for free and expect to make money. Not only is this a losing battle, but you’ll also be wasting a whole lot of time that you could otherwise use to actually profit from your own self-hosted site. Don’t take my word for it, do your own research.
Is there a future for blogging?
You bet there is. There is a future for something that still requires information and first-hand experience (your experience). Sure, there are so niches out there that are highly saturated and it might be hard to make money – which is why you can either niche down or find topics that address an audience that needs your voice.
PIN ME FOR LATER

***
As always, if you want to connect reach out to me via email or leave a comment below. This guide on how to start a blog in 2025 might seem like a lot but don’t worry – just start.
Further Reading:
Quotes to Keep You Motivated While Working From Home